If you are facing trouble adding your credit card charges in QuickBooks Online. Don’t worry! We can help you how to enter your credit card expense in QuickBooks Online. Whether you run a business or intend to be an accountant, it is essential to learn how to correctly document credit card transactions to maintain the accuracy of your financial records.
This comprehensive guide will provide a step-by-step process of setting up your credit card account to record charges and reconcile statements in QuickBooks Online.
Let’s get started!
Table of Contents
Understanding the Importance of Accurate Credit Card Tracking
You can use your credit card for personal and business expenses. But accurate credit card tracking is important for businesses of all sizes. It allows you to closely monitor your expenses and cash flow. Failure tracking can lead to financial discrepancies, missed deductions, and even legal issues during tax season.
By using QuickBooks Online to record your credit card charges, you’ll have a centralized system that simplifies the process, reduces the chances of errors, and provides real-time insights into your financial health.
Now, let’s go ahead and find out the step-by-step process of
Setting Up Credit Card Accounts in QuickBooks Online
Before recording credit card charges in QuickBooks Online, you need to set up your credit card accounts. This step is essential as it allows you to separate your credit card transactions from your other accounts, making tracking and categorizing expenses easier.
To set up a credit card account in QuickBooks Online, follow these simple steps:
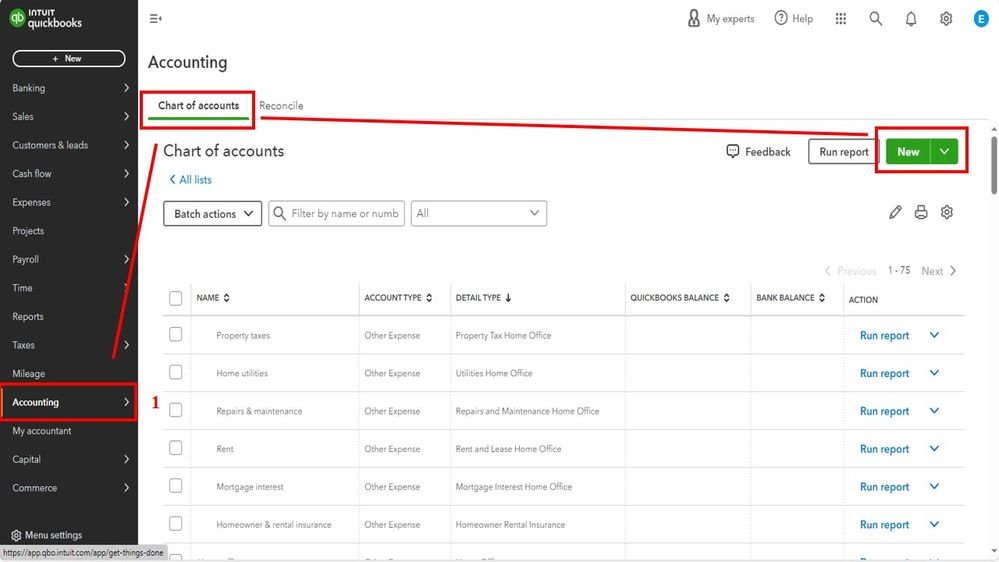
- Log in to your QuickBooks Online account and navigate to the “Chart of Accounts” section.
- Click on the “New” button to create a new account.

[Image Credit: quickbooks.intuit.com]
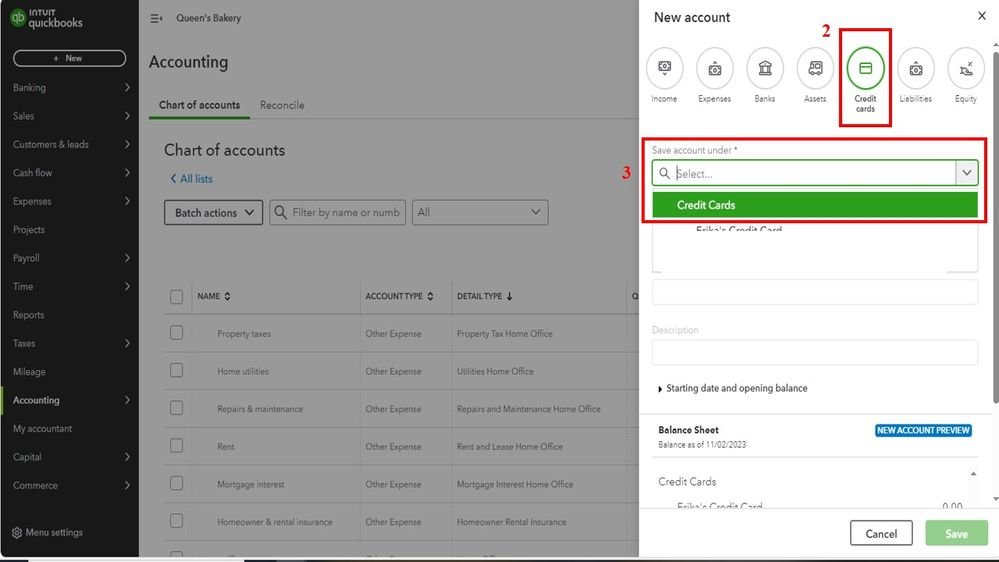
- Select “Credit Card” as the account type and provide the necessary details, such as the account name and opening balance.

- From the “Tax Form Section, select a credit card.
- Fill out the all the required information in the form
- Finally click the “Save” button and you’re ready to start recording credit card charges.

Remember to set up separate accounts for each credit card you use, as this will ensure accurate tracking and reporting.
Note*: In QuickBooks Online, credit cards are treated as liabilities, but they are recorded and classified as credit cards but still, they are liabilities or loans.
How to Enter Credit Card Charges in QuickBooks Online?
Once you have set up your credit card account, you can add credit card charges in QuickBooks Online. Here’s how you can do it step by step:
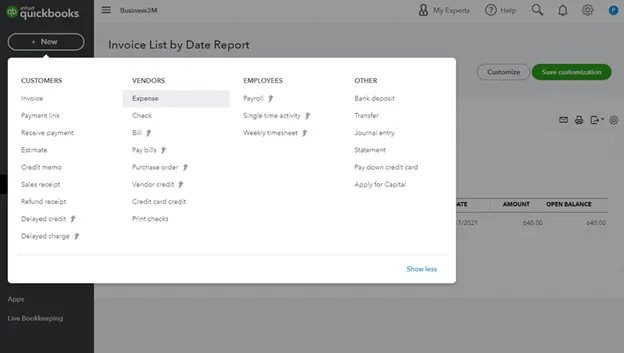
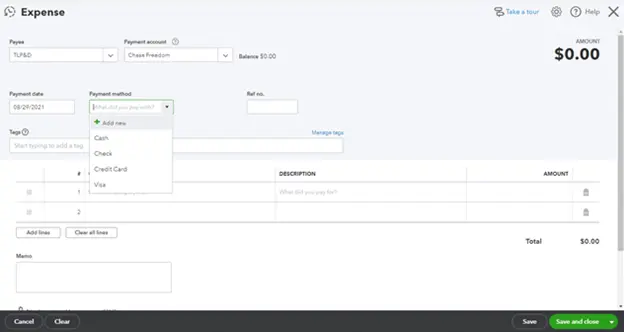
- Click the big green “+” New button and choose Expense.
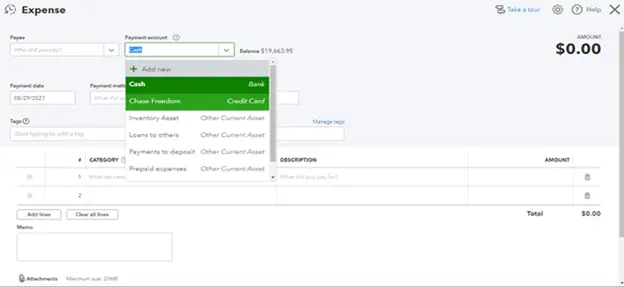
- Under Payment Account, select the credit card you used.
- Choose the type of credit card (Visa, MasterCard, etc.) from the Payment method
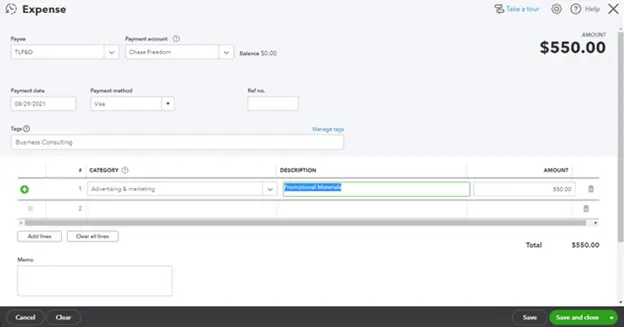
- Fill in any other details like the date and amount.
- Once you’re done, just hit Save and Close.
How to Manually Enter Credit Card Charges into QuickBooks Online
Recording credit card charges in QuickBooks Online is appropriate when you receive physical receipts or need to enter transactions that are not automatically imported.
- Click the “+” New button at the top right.
- Choose “Expense” under Vendors.

- Pick the vendor you paid (or add them if new): In the Payee box, start typing the name of the company or person you paid. QuickBooks will try to guess who it is based on what you’ve entered before. If it’s someone new, click Add New. Don’t worry about all the details yet, just their name for now. You can add their address or phone number later if you want.
- In the Payment Account field, choose the account you used to pay. You’ll see a list of your existing accounts, like “credit cards” and “bank accounts”. If the account isn’t there, just click “+” “Add New” and give it a name (like “New Credit Card”). You can skip the other details for now, or can add them accordingly.

- Enter the date of the expense.
- Choose a Credit Card as the payment method.

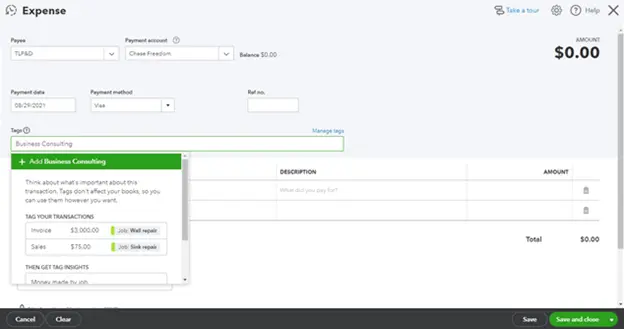
- (Optional) Add tags to categorize your expense (like “Office Supplies”).

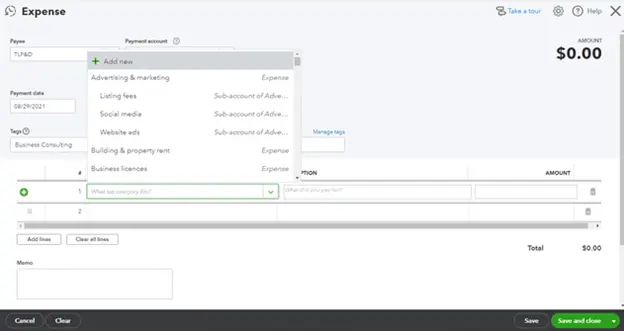
- Pick a tax category or create a new one if needed.

- Briefly describe the expense (like “Stapler purchase”).
- Enter the amount and hit Save.

Bonus Tip: Once your bank statement comes in, QuickBooks can automatically match these charges for you, making it even easier!
By manually recording credit card charges, you have complete control over the accuracy and categorization of each transaction, ensuring that your financial records are up-to-date and organized.
Importing Credit Card Transactions into QuickBooks Online
QuickBooks Online also lets you import credit card transactions directly from your bank or provider. This method saves time and reduces the chances of manual data entry errors, especially when dealing with large transactions.
To import credit card transactions into QuickBooks Online, follow these steps:
- Log in to your QuickBooks Online account and navigate to the “Banking” section.
- Click the “Connect Account” button and search for your credit card provider.
- Follow the on-screen instructions to connect your credit card account to QuickBooks Online.
- Once connected, QuickBooks Online will automatically import your credit card transactions.
- Review each transaction to ensure accuracy and make any necessary adjustments.
- Categorize the transactions by selecting the appropriate account or creating a new one if needed.
- Save the transactions, which will be recorded in your credit card account.
Importing credit card transactions streamlines the data entry process and reduces the chances of errors. However, it’s essential to review each transaction to ensure accuracy and proper categorization.
Categorizing and Reconciling Credit Card Charges in QuickBooks Online
Correctly categorizing and reconciling your credit card charges is essential for accurate financial reporting and analysis. QuickBooks Online provides tools to help you categorize expenses, reconcile statements, and ensure that your records align with your credit card statements.
Follow these simple steps:
- Navigate to the “Transactions” section of QuickBooks Online.
- Review each credit card charge and assign the appropriate account category.
- Ensure that the charges are categorized correctly to reflect the nature of the expense.
- Reconcile your credit card statement by comparing the transactions in QuickBooks Online to your actual statement.
- Make any necessary adjustments or corrections to ensure that the records match.
Regularly reconciling your credit card charges in QuickBooks Online ensures that your financial records are accurate and up to date. It also helps identify any discrepancies or potential issues early on.
How to Track Credit Card Expenses in QuickBooks (QB)?
There are two ways to track your credit card spending in QuickBooks (QB).
Link your Credit Card Directly to QuickBook
The easiest way is to link your credit card directly to QuickBook (QB). This lets you see your charges and categorize them as business expenses.
Add Credit Cards Manually to Charts of Accounts Without Linking
But if linking isn’t an option, or you have a personal credit card with some business charges, no worries! You can still add those charges manually.
Just be sure to record the expense (what you bought) and the payment (how you paid it off with your business account). Think of it like this: imagine you accidentally used your credit card for office supplies. You’d want to track that as an office expense, and then record paying it back with your business funds.
In most cases, linking your card or entering it manually in the chart of accounts and then adding expense categories is the way to go. This helps keep your books organized!
How to Record Cash Advances from Credit Cards in QuickBooks?
You might be thinking, should cash advances be entered like regular credit card transactions in QuickBooks?
The simple answer is yes!
If you get a cash advance on your credit card, you can track it in QuickBooks online. This is the same as regular charges, payments, and credits. It helps get a clearer picture of your business finances and profit. Here’s how it works:
- Click the big green “+” New button and choose Expense.
- In the “Payee” Field, pick the credit card company (like “Visa” or “Mastercard”).
- From the “Payment Account”, select the business account you used to withdraw the cash (like “Checking”).
- Enter the date you got the cash advance in the “Payment Date” field.
- Under “Payment Method”, choose how you paid for it (usually “Credit Card”).
- Type in the amount of the Cash Advance.
- Fill out any other details you need (like a memo for what the cash was used for).
- Once everything looks good, hit “Save and Close”.

That’s it! Now your cash advance is all tracked in QuickBooks.
Tips for Efficient Credit Card Charge Entry in QuickBooks Online
When adding credit card charges to QuickBooks Online, this can be a laborious and lengthy process, mainly when discussing many transactions. undefined:
- With the QuickBooks Online mobile app, you can snap and attach receipts to your transactions whenever you are out and about.
- Make automatic payments for regular credit card charges, e.g., subscriptions or monthly expenses, by setting up recurring transactions.
- Apply the bank rules in QuickBooks Online and get the transactions automatically categorized according to the set conditions.
- Don’t forget to monitor and update your account charts as they need to reflect the expense categories of the moment.
- Exploit the batch transaction option in QuickBooks Online to perform many transactions together.
The effectiveness of these practices will give you more time and energy to concentrate on other areas of your small business that require more of your attention.
Common mistakes to avoid
While QuickBooks Online provides a user-friendly interface for entering credit card charges, there are some common mistakes that users should be aware of and avoid:
- Mixing personal and business expenses: Ensure you only record business-related credit card charges in QuickBooks Online and separate personal expenses.
- Failing to reconcile statements: Regularly reconcile your credit card statements to identify discrepancies and ensure that your records are accurate.
- Incorrect categorization: Take the time to properly categorise each credit card charge to reflect the nature of the expense accurately.
- Neglect to attach receipts: Always attach receipts or supporting documents for each credit card charge to maintain proper documentation.
By avoiding these common mistakes, you can maintain accurate financial records and avoid potential issues.
Troubleshooting and Resolving Issues
Despite its user-friendly interface, QuickBooks Online may occasionally encounter issues when entering credit card charges. It’s essential to be aware of common troubleshooting steps and know how to resolve any problems that may arise.
If you encounter issues with credit card charges in QuickBooks Online, consider the following troubleshooting steps:
- Check your internet connection. Ensure you have a stable internet connection to avoid connectivity issues.
- Clearing your browser cache: Clearing your browser cache can help resolve any temporary issues or conflicts.
- Update QuickBooks Online: Make sure you’re using the latest version of QuickBooks Online to benefit from bug fixes and improvements.
- Contact QuickBooks Online support: If you cannot resolve the issue independently, contact QuickBooks Online for assistance.
By following these troubleshooting steps, you can quickly resolve issues and continue effectively managing your credit card charges in QuickBooks Online.
Conclusion
In conclusion, effectively managing your credit card charges is essential for maintaining accurate financial records and ensuring the economic health of your business. QuickBooks Online provides a user-friendly platform that simplifies entering and tracking credit card charges.
FAQs: How to Enter Credit Card Charges in QuickBooks Online?
How do I enter credit card charges in QuickBooks Online?
- To enter credit card charges in QuickBooks Online, go to the “+ New” button and select “Expense” or “Check”.
- Choose the credit card account you want to record the charge for.
- Fill out the expense details including the payee, date, amount, and category.
- Select “Save and Close” to record the charge.
Can I enter credit card charges for purchases made with my business credit card?
Yes, you can enter credit card charges for any purchases made with your business credit card in QuickBooks Online. Make sure to categorize the expense appropriately to reflect the nature of the purchase.
What if I need to split a credit card charge between multiple categories or accounts?
QuickBooks Online allows you to split credit card charges across multiple categories or accounts. When entering the expense, select “Split” and allocate the amounts accordingly to each category or account.
Can I set up recurring credit card charges in QuickBooks Online?
Yes, you can set up recurring credit card charges in QuickBooks Online using the recurring transactions feature. This is useful for expenses that occur regularly, such as monthly subscriptions or membership fees.
